Pages

Thursday, October 27, 2011

Progress!!!!

Oh, I can't wait to show you the first quilt from the Quilting for Kids blocks. It's done...and soooo pretty!!!

There is no way that I could have gotten all of those beautiful fabrics together without so many ladies.

I will be posting soon about it, with pretty pictures.

I am going to be at a ladies' conference this weekend, so plan on checking it out next week sometime.

And.....here's a pic of my beautiful quilting gloves...

Yes, I use dishwashing gloves to quilt

I started using them on my first free motion quilt and was pleasantly surprised at how good they worked! But my hands do tend to get hot in there.

By the way, do you zig-zag stitch after you've sewn on your binding? I have found that this extra step that takes about 10 minutes, makes life soooo much easier when it's time to fold and sew the binding down.

Have a good weekend all!

Tuesday, October 25, 2011

Tutorial: Stockings for Kids

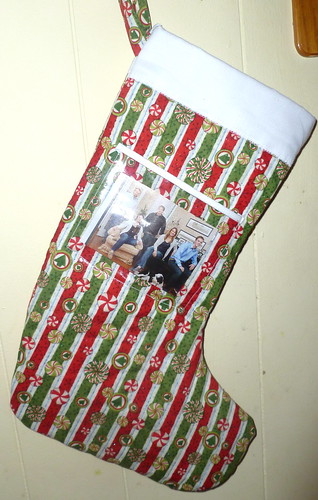
I have joined Lyanna of Purple Panda Quilts and have made a stocking for one of the foster children she works with.

Please go to her website and join her flickr group to make a stocking too.  She's got great tutorials on simple stockings.  And really, to make one, it takes no longer than an hour or so.

Stocking for Foster Children

I have a little tutorial on how to add a picture pocket to the stocking that I'm going to share with you today.


Start with a piece of clear plastic bought from the remnant bin at your local quilt shop.

You can make yours whatever size you want.  A picture is usually 3.5 x 5 inches or 4 x 6, but many pictures can be cut down to a smaller size.

Then take a piece of white (or whatever color you want) and make sure it is about 1/2 an inch longer than the top of your plastic piece.  The width of the white should be one inch.

You will fold the one inch piece of white in half, like the picture shows, then iron.  This will give you a good crease.

Use the crease that you just made as a guide.  You will fold both sides of the crease into itself.  See the picture below for an idea of what I mean.  Line up the edge of the white to the center crease on both sides.  Then press with an iron.

Once your piece of fabric looks like the picture above, fold it in half again.  So now it is folded on the original crease that you made.  And both sides of the fabric are folded so that they look like binding.
Next, place the plastic piece in between the white fold.  This will be the top of the picture pocket.
This is what it should look like so far.
Next, place it where you want it.  Pin it, and on the end of the white strip, where you have raw edges, just fold them over and pin under.   You will not be able to see the raw edges if you do it this way.
Sew from the right end of the white strip, down to the bottom, turn your fabric.  Go along the bottom, turn again, then go up to the left end of the white strip and back stitch to secure.  DO NOT sew along the white strip again.  That does not get sewn onto the stocking.

And that's it!  Then continue with sewing your two sides of the stocking together.  Make sure you do not try to add the pocket after the stocking is sewn together...you'll be miserable ripping seams!

I'm so glad Lyanna is putting in so much time and effort into making this Christmas special for the children in foster care that she works with.  And thank you for helping!

Fresh Poppy Design
WIP Wednesday at Freshly Pieced

Monday, October 24, 2011

Monday!

Sometimes I feel like such a slacker!  But then I remember, I have a clean house....and I'm okay with myself again.  So that's what I've been up to!

I love creating and blogging, but sometimes can't get to both, while keeping the kids fed and mentally stimulated and keeping the house in some kind of working order.  So here I am again, caught up.

And here's what I've made. 

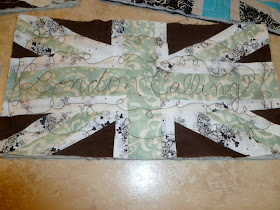
Union Jack mug rugs!  (Pattern available here for free!)


These have a special place in my heart, and are made for a special reason.

My husband and I and our three boys will be moving to London in the near future.  We are going to work with a church that is there, and eventually begin other churches.  For those who know the term, we are missionaries.  Right now, we are in the process of raising our monthly support, which means that we are traveling, well mostly my husband is traveling while I stay with the kids who are in school.  We visit churches and ask them to partner with us in our "London Calling."  Thus the free motion quilting on the mug rug.  I plan to make these and send one to each of our supporters. 


I also finished my first commissioned quilt.  Quilt pics to come for this king sized quilt!  It's finally beautiful out here in South Florida...no more rain and a cool front blew in.  Yay!

I'm linking up today.  Go check out what others are making.

{Sew} Modern Monday at Canoe Ridge Creations
Sew Happy Geek

Monday, October 17, 2011

Guest Post: Spider Web Placemat Tutorial

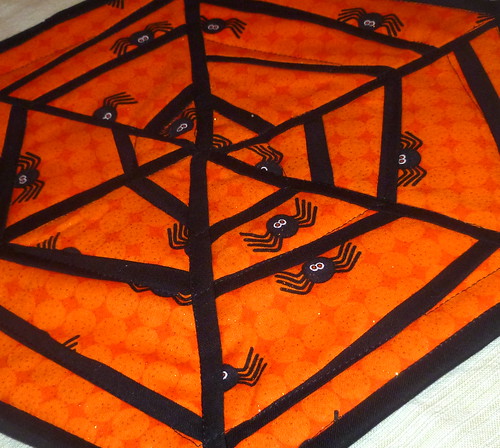
Here's a spider web place mat to make your table look spooktacular!  It's mostly paper piecing, but it goes pretty fast.  So, ya ready?


First, you'll need the paper templates called Wonky Web.  There are two pages of them.  Page 1 has triangle 1 and 3 on it.  Page 2 has triangle 2 on it.  You will need two of each, for a total of 6 triangles.

The seam allowance is already calculated into the triangle (the dotted line) so you can cut on the solid line.

You will also need:
1/3 yard colored material for background (cut into strips 3" strips)
1/3 yard black material for web and binding (cut into 2" strips)
15" x 15" piece of fabric for back
15' x 15" piece of batting


The next step is to start paper piecing.  You will alternate between a solid color (in my pictures, I used white) and black.  You will need strips of the solid color that range from 2 to 3 inches in width.  Black strips of 1.5 inches will work fine for the web.

Glue down your first piece of white on the opposite side of the paper than the lines are drawn on.  Make sure that the white covers the whole area and leaves enough for the seam allowance where the black will meet the white.
Next, place a piece of black, right sides together on top of the white, and sew. Make sure you leave at least 1/4 inch for the seam allowance.  And since you're sewing through paper, set your stitch length to 1.5 or 2.

Fold the paper back, like in the picture above, and cut a 1/4 inch seam allowance.

In the picture below, I was trying to show you the 1/4 inch seam, but look at the scary eyes that showed up on my ruler!  It was the reflection from the light. Weird, huh?
  

Here's a better picture of what I was trying to show you.  You will want to measure and cut this 1/4 inch because the black spider web is only a 1/4 inch.  So you don't want it getting too big and bulky.

Fold the black back down the right way, and press using an iron, or just finger press.  Whatever you're comfortable with.

Add your next white strip, and sew along the line.

See that picture above?  That will make you go crazy!  When I sewed the white strip on, it was long enough for where the seam was, but when I folded it down, it was too short on one side, because the triangle is getting wider.  If that happens, carefully remove the seam, but don't break the paper.

And next time, do like the picture below.  Place the white piece you're using down approximately where the seam will be.  Fold it over and make sure that you have enough fabric to completely cover the area.  It will save you seam ripping and sanity!


Go ahead and get all the triangles done.  Then press them, then trim them using the paper on the back as the guide.

Now, if you flip them over to the back where you see the lines from the template, your numbers should be 1, 2, 3.   The next step is to turn them back over.  And when they are right sides up, the number 3 will be all the way to the left, then 2, then 1 all the way on the right. If you get totally confused, just make sure the arrow is pointing to the center, then match up the lines of the web.

So far, so good.  Time to add the last pieces.  You will use  black to create the strands of the web that go from the center out.  So cut yourself a piece of 2 inch black and see the next step.

Line up the black with the edge of the paper, and sew along the long line.
Flip it over and press.  Then trim the triangle again, using the paper as a guide.
Once you've added the black to all of the triangles, time to tear the paper.  Be careful that you don't tear too hard and also, be careful on the edges of the fabric.  Make sure the thread is not coming loose.

Now it's time to sew the triangles together.  They will naturally lay down to the side, and I would recommend leaving them that way, because if you iron the seams open, it will do funky things in the center when you're ready to sew the two pieces together.

Sew the 3, 2, 1 together.  Then sew the other 3, 2, 1 together.  You will have two pieces.  Sew the long side together, like in the picture below.
Press your web.  Quilt is however you like.  I did lines echoing the web, in white thread.

When it comes to binding, I didn't want a very thick binding, so I took a piece of 2 inch black and sewed it directly onto the front of the web.  (I don't have pictures of this step.)  I did not fold the binding before I sewed it.  It was simply a piece of 2 inch fabric that I lined up along the edge.

At the corners, I folded them like you would do with any binding, and went around the whole piece.  When I was done, I turned the piece right side up, and ironed the binding down flat.

Then, take part of the binding that is not sewn down, and fold it in half.  Match it up with the edge of the piece.  In the picture below, you can see my binding that is already sewn on and ironed from the front.  Then it is folded and ironed to create a seamless edge.  Then you will take the binding and fold it over the quilt, like normal, and pin and sew. 
(I am holding the fold open, so you can see.)


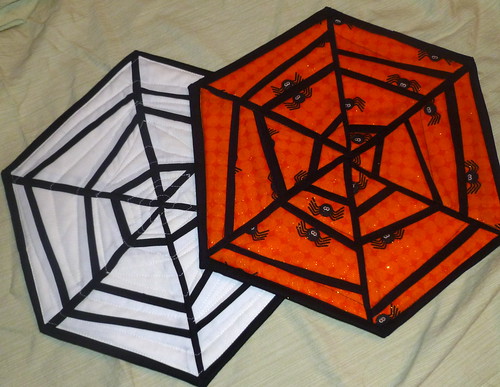
And there you have it.  One spider web place mat! You can see that I made the white one where all the lines match up.  The orange one is the same lines, just not matched up.  So it will look fine either way you do it!

Thank you, Jenna for allowing me to share this!  I hope that if you make this, you will share your photos with me in my flickr group SoSarahSews.  And go ahead and follow my blog, because there's more where that came from!


{Sew} Modern Monday at Canoe Ridge Creations

The Girl Creative WIP Wednesday at Freshly Pieced Esther’s Blog

Wednesday, October 12, 2011

Tell me what you think!

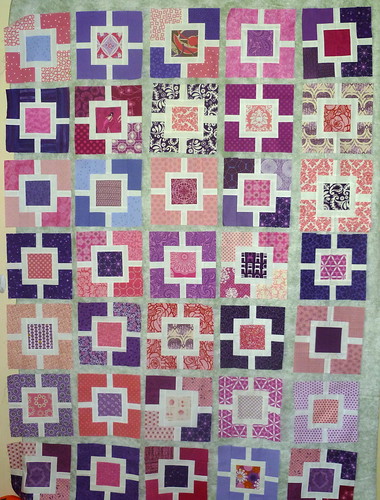
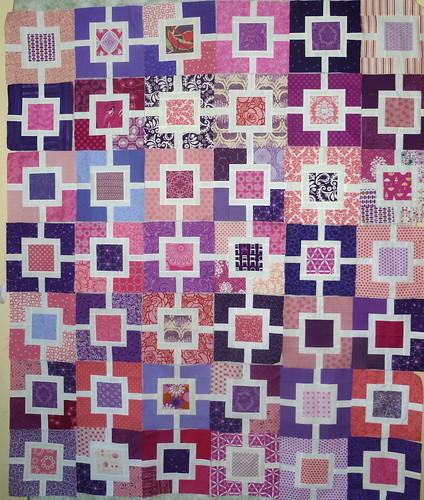
I've got the Quilting for Kids     Garden Fence quilt up on the wall.

The original pattern has 1 inch white sashing around all the blocks, like the way that looks in this picture. 


With Sashing


But.....I'm LOVING the purples and pinks together, without the sashing.  I think it works well without the sashing because the pinks and purples are all different shades and designs.

P1010440

But I really want to know what you think.  Do you think it's too much?  Does it need to be separated by the white? 

Please comment and let me know what you think...sooner rather than later, because I'm tempted to just start sewing! And take the poll ---> over there, at the top on the right!

Thank you!

And I'm linked up with WIP Wednesday at Freshly Pieced

Sew Happy Geek