Tuesday, August 30, 2011

My First Bee

I've just completed the blocks for my very first mini bee ever.

There's a whole group of quilters doing this over at the flicker group.

There are 6 people in each "hive."  Each person tells the others two or three colors that they want their quilt to be.  Each person then makes the same block in each color palette that the others have chosen.

So I made five blocks to send out to others.  I also made a block for me, in the colors that I chose, as a way to test the pattern.

In the end, after I receive my blocks, I'll have 6 different blocks made with different fabrics.  I can't wait to get mine and see how they go together.

Here is a picture of the blocks I made.

Hive 2 quarter 3
Denise's Star

As you can see, the colors are very different.  Some are for boys' quilts, so I didn't want anything too girlie.

I had a good time making them and now I'm sending them off!

Monday, August 29, 2011

Quilting for Kids Update

Things are really hopping along over at the newly founded  Quilting for Kids Flickr group!

If you haven't joined, feel free to.  But I have to say, that we only need 2 more commitments for the Garden Fence block (shown below) and then we're done!

blocks for the kids
Made by Jennifer at Knotted-Thread
  
We've reached our goal for the Charming Stars Quilt.  Here's a great example from Amy at CraftyDame:
star 2

I can't believe that so many of you have joined in this group and have already completed your blocks and sent them on their way! (Okay, I have to stop using exclamation points so much...but I'm really excited.)

You see, I'm a new blog.  When I posted this Call for Help a week ago, I had about 32 followers.  So I didn't really know if I would get many responses.  But those followers came through and then passed the information on to their followers.  Now I'm at a *whopping 45*.  Small potatoes, I know, but it's still exciting to me!

I really am very grateful that so many have helped out.  Please go on over to the flickr group and see what great purple and pink blocks have been made. 

And again, go on back and check out why we're even doing this.  You can find the story here.

I think when these are finished, we may do another quilt.  There is no shortage of kids in the foster system who could use something to call their own.  So, what do you think? Would you make another block? Would you be willing to receive the blocks and make them into a quilt for a child?  We can really do something here!

Linking with {Sew} Modern Monday at Canoe Ridge Creations

Tuesday, August 23, 2011

WIP Wednesday

It's been a busy week here!

New school year, and new projects!

I would love for you all to read my blog post about what I'm trying to do for two foster children that my mother works with.  You can read it here and updated here.  We're trying to create two quilts for two sisters. Please check it out and see if you'd like to help out.  Thank you!

This is a block that I've made for one of the quilts for the sisters:
Block for foster kids.

You can see the other blocks here. They're easy to make and get put together quickly.

I've also started making my first block for the 3x6 bee block that I'm in on Flickr.
Here is my test design.


Practice block in my colors.


Other than that, so far this week, I finished my mom's quilt and she loved it! You can see it here.

Thanks for checking in and once again, PLEASE Read my CALL FOR HELP and see if you can join us!!! Again, the blocks and more information are here. 

Today I'm linking with Esther's BlogSew Happy Geek, Freshly Pieced, and Quiltstory - thanks for the link ups! You guys are awesome!

You girls really know how to jump in when you're needed!

The response to my CALL FOR HELP has been tremendous!  I got many replies of people willing to help out with these two special quilts for the girls in foster care.  Please read the rest of the story if you haven't already and see if you'd like to help.

There are a few changes.  We've decided on two blocks. And we will use pink and purple in all of the blocks.

One block will be made using this tutorial from  Moda Bake Shop. It's called "Charming Stars" by Stefanie from Little Lady Patchwork,  and it's beautiful! Here is one of the blocks that a member has already made:


Block for Sarah 1
by: jenjohnston 
 
The other block we will be making is called "Garden Fence" using this tutorial at Hyacinth Quilt Designs.

Here are two that have been made already.

Garden Fence
by: Jen at Punkin Handmades

I am so excited about doing this.  Even more excited that you all are joining me.

If you would like to join us, now that you know that the blocks are not crazy hard, please feel free to do so!  Let me know by leaving me a comment, and I will send you an invite through Flickr to join our group Quilting for Kids.  Please tell me your flickr name.

Once part of the group, there are two discussions.  One is a sign up for the stars blocks and one for the squares block.  You can sign up to do as many as you wish.

And one more thing, if you have a blog, feel free to spread the word about this.  You can link up to this post or the previous one and see if any of your followers would like to join us. 

Thank you so much!

Sunday, August 21, 2011

I Need YOUR Help!

Can I sit down with you over a cup of tea or coffee and just like we're old friends, plainly ask you for help?

Here's my idea. My mom works with foster children. She's their "guardian" which means that she's objectively looking out for the best interest of children in foster care. She's doing what the parents of these children should be doing.

This job has rewarding days, and days that make you want to cry. She's seen great victories, when parents are rehabilitated and reunited with their children, when children are adopted by wonderful people. She's also seen horrible days when parental rights have been terminated, when children are left with no hope.

My mom is really very good at this job. A tender and open heart, but stern and stubborn. She doesn't give up on people.

She's been working with a set of sisters. It's been 5 or 6 years now. She's seen them go from sweet, loving, caring, hugging 7 and 8 year olds to closed and scared 12 and 13 year olds. She's still there. Their one constant over the many years and many houses they've lived in. She fights for them at school and receives their calls when they're crying.

When I was telling my mom about the different bees there are that benefit children by giving them quilts, I could see her eyes light up. I knew she was wishing for something like that for her set of sisters. Something that they could take with them that would give them comfort and remind them of her and all that she's poured into them.

This is where you come in. Would you be willing to send me a 12 inch block? With your help I could make two quilts for them by Christmas. I know that it would mean so much to these girls to have their own beautiful quilt that they could take with them wherever they go.

So if you're interested, their favorite colors are pink and purple. They are 12 and 13, so no little girlie things. I will need these no later than October 7th. We'll be doing a lot of traveling after that.

Please leave me a comment. Tell me if you'd like to join the Flickr group Quilting for Kids and I'll send you an invite. (Leave me your flickr name.) Also, tell me if you'd like to make one or two blocks. We'll be deciding which blocks to make together on Flickr.

I'm really very excited about doing this for these girls. I know it will mean so much to them. Thank you in advance for your help!

And I hope you enjoyed our cup of tea!

****Please see this link for directions on the blocks.  We have decided on two patterns.  Please check this link before you make any blocks!****

Saturday, August 20, 2011

Mom's Birthday

My Mom is great. She really is.  She is so great, that for her 50th birthday, my sister-in-law gave her a granddaughter.   And then for her 60th birthday, I gave her a grandson!  Can you believe it?  Two grandkids born on your birthday?  August 24th is a busy day around our family.

So this may not be the "best" gift she's ever received, because how can you top two grandkids? But she says this is the best "non-living" gift she's received (from me, at least) and she's very happy with it.

Here she is holding it up.  She didn't even want me to show her feet.

Front Quilted

And here's the back.

Back Quilted

I basically just traced around the existing lines for the quilting.

I also added a special note for her on the back:

Tag for Mom's Quilt
"I love you, Mom! You're the best. <3 Sarah 2011"

I stitched this and then whip stitched it on to the back. I also had this great fabric that says, "I love my family" and "One big crazy family." These statements go great with our family.

I love you Mom! Happy Birthday!

Wednesday, August 17, 2011

WIP Wednesday

I've been on vacation for 5 days, so I didn't get much done other than some more hexagons for my hexalong with Lynne at Lilysquilts.  Here is the whole big happy family.  I do believe that I will be adding in more solids and some hexagons that are just one fabric.

New members to the crazy family

I also finished the quilt top for my Summer Sampler Series and made a tutorial for my "Mitered Tiled Borders" as I'm calling them.  Here is the link for that tutorial.


Probably as you read this, it's either being basted or quilted....or maybe I'm just being ambitious?
So tell me, who's ready for school to start?!

And I'll leave you with the view from my sewing machine this afternoon.  

The only one who will not be going to school this year:
Peek-a-boo behind the sewing basket...and eating apple sauce on the same table I'm sewing on.  
I'm crazy, I know.

How to make a Mitered Border

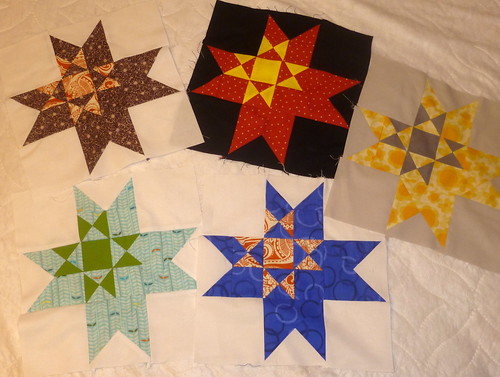
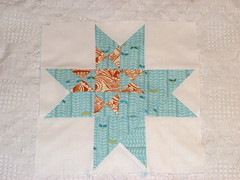
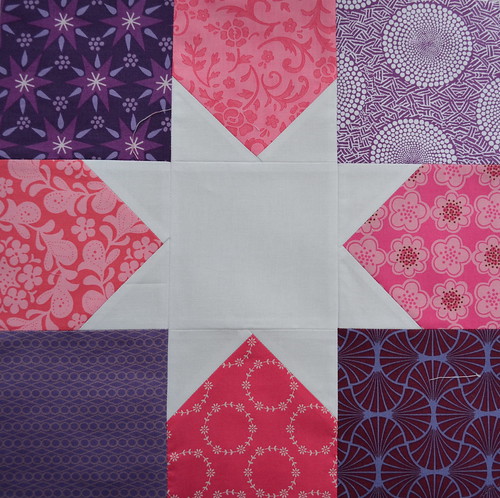
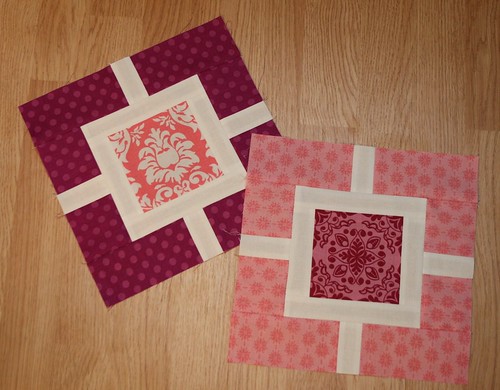
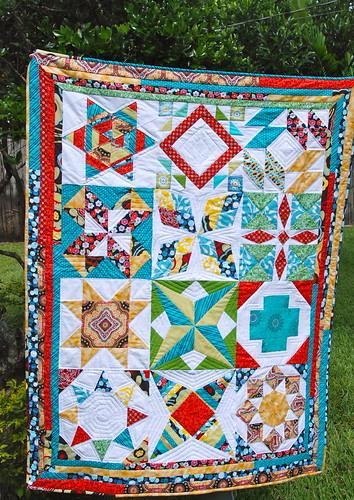
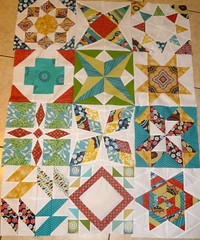
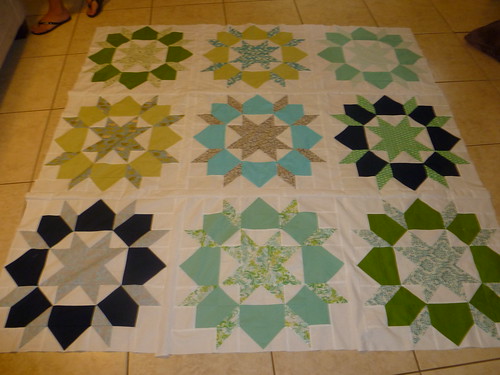
My Summer Sampler Series quilt top is finished and I thought that I would do a little tutorial on my border.  It's different from anything that I've ever done.

Here's a picture of the mitered corners. 

I wanted to make the border a scrappy mosaic type of border.
I think it turned out nice.  
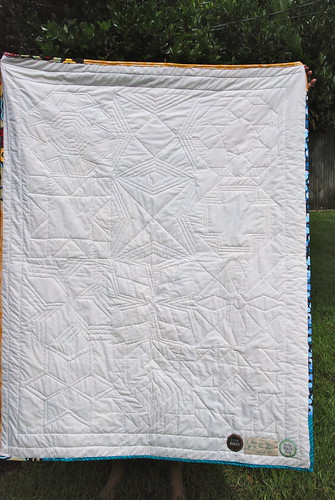
And I decided to leave all the white in the middle of the quilt to bring your eyes to the center, where all the hard work was put in!

So here's how you make a tiled, mitered border. 

First decide how wide you want your strips to be, then cut them half an inch wider to allow a quarter inch seam allowance on both sides.  Mine will be 1 inch finished, so I cut them 1.5 inches.  

Then sew them together in one continuous line.

To decide how you long your strips should be, use this formula, taken from Quilt University.com

For a  mitered seam, you must add another 2" on EACH side for the miter.  If your main quilt is 36" and the border is 2" wide, the math would look like this:
miter + border width + body of quilt + border width + miter + seam allowance
(the seam allowance is 1/2", which is 1/4" on each side and needs to be added only ONCE for the entire piece)
2" + 2" + 36" + 2" + 2" + 1/2" seam allowance = 44 1/2"

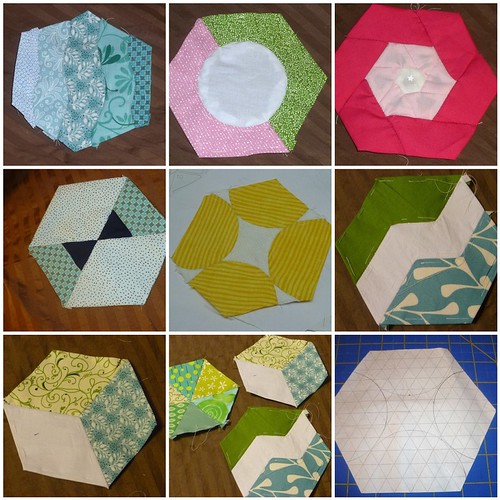
 There are two ways you can do it from here.  Cut your strips to the length you need, based on the math above, then sew them together.  I ended up doing 3  rows of 1 inch strips.  Once you have them sewn together, you can then sew them to the quilt body, making sure to leave the correct amount of fabric free on each side of the quilt for the mitered corners.  In the example above, you would need to leave 4 and a quarter inches on each side. 

Or
You can do it the way I did.
I started with one strip at a time.  I added the first trip to  the body of the quilt and left 3 inches hanging off the side, to allow for my mitered corners.

Don't forget to leave the same amount at the end of the strip.

I continued to add strips.  This is what it looks like with one side done.

Now it's time to turn the quilt and sew the strips onto the next side.  See where the pin is pointing?  This is where you will begin sewing.  Do not sew the other border strips to this strip.  You will sew the two together later, when you miter the corners.  I did a back stitch here, just in case. 
Here's the next strip on the second side of the quilt.  
Make sure you hold the other border strips away from the needle.
Once you have two sides done, you can begin mitering them.  
Fold the quilt so that the edges of the two borders line up.  
The edges in this picture are down next to my pinkie.

Since my border has different strips, I needed to make sure that the strips are matching up in a straight line, so that when I sew it, it will look like one continuous line. 

Pin the fabric in place, so that the lines will not shift.  
Then line a ruler up along the folded quilt body to the end of the border.  
Mark with a pencil, erasable pen, or a sharpie like I did, just make sure that you know that part of the sharpie will not be seen.  (I just didn't have anything else dark enough to see the straight line.)  

Sew. Begin where the two borders meet at the quilt body and sew out.  Start your stitch and make sure you lock it with a back stitch.


After you sew, check your corner to make sure that everything lines up correctly and that it lays down flat.  If it doesn't lay down flat or puckers, you'll probably have to try again. 

Once you're satisfied, go ahead and cut off the excess on the corner, just make sure that you leave a good seam allowance.  I made mine half an inch.

That should be it! I hope that your mitered corners give you no problems along the way.  
There's always a learning curve, but it was fairly easy for me, even though it was my first time! 
Please let me know if you try it.

And don't forget to enjoy the view from your sewing machine!
Here's mine :)


Friday, August 12, 2011

Wanna Be Quilters

Hello all you wanna be quilters out there! Madamme Samm over at Sewwequilt.com is giving away amazing prizes for those of you who do not have any quilting tools but would love to start quilting. You should definitely check it out. She has easy instructions for you to follow on how to get in on the action.

Those of you who are already quilters, there's reason for you to stop by there as well! She has great giveaways for those of us who are already quilters, as well as great tutorials on some awesome products.

Thank you Madamme Samm for putting this all together!
Go check it out www.sewwequilt.com

Tuesday, August 9, 2011

This Week's WIP's

I've actually got a lot done this week, but it's little stuff, so there's nothing super awesome to show you! :(

But I'll show you what I've got.

I've been working on my hexalong with the girls at Lily's Quilts and here's what I've come up with so far.


Hexies together
Here is a little hexie family that is different as can be.  I've been making what comes to mind, using scraps mostly from my pink, yellow, green and blue bag.  And this is what happens when you don't have a plan!   But I'm just going to keep going and see what it looks like in the end.  And it will be my very own one-of-a-kind quilt that no one will ever duplicate because it's such a hodge-podge.

And then there's this....

7 in 1
This is what you get when you plan.  I used 7 hexagons to get this pattern.  And I don't think it goes at all with the hodge-podge mess, so looks like I'll have another hexagon quilt coming together that will be more of these "medallions" put together.  It should be nice, although very traditional, and not usually what I make.  But that's okay.


Summer Sampler Almost finished

In other news, my blocks for the Summer Sampler Quilt are finished.  It was fun to make, but man those EPP blocks are crazy! They take so much time.  But the finished product is amazing.  And I also fixed the mosaic block at the bottom left.  I just couldn't leave it wrong.

No quilts finished this week.
Too many project for my little head to handle, including going through my three sons' clothes and handing down the clothes
that are too small to little brother(s).
Seems like I have to do this twice a year.  They grow like weeds! 

I'll be gone on a little vacation until next Wednesday, so enjoy sewing and creating.  I'll be working on my hexies, the crazy ones or the planned ones, I don't know, but my hands will be busy!

Friday, August 5, 2011

Think Outside the Hexagon

I've seen some great examples in this Hexalong of using more than 
one hexagon to create a unified pattern.

Here are a few:

Hex #12

Look at the star is this 3 in 1 by lizquiltz.  I think it's amazing!

Hexalong

Here's another one by Lynne at lilysquilts.

I just love how flickr allows us to share all of these ideas.  Here's the link to LilysQuilts Flickr .

I have been inspired to "think outside the hexagon."

I have a few different ideas swirling around in my head, but alas, 
my hands will only allow me to do one at a time.  

So here is a completed 7 in 1 hexagon:

7 in 1

My husband think that it would be really cool to do a whole quilt with these, and I do, too.  

But then when would I have time to make all of these other 
crazy ideas that I have in my head come to life?

Tuesday, August 2, 2011

WIP Wednesday

Oh so much has been going on!  It's been a great week.  Here's the update.  (So glad this keeps me accountable and going!)

This is part of the Summer Sampler Series.  I'm almost caught up.  There are some I like, others not so much, but I think it all works together.  And yes....my Mosaic is all wrong...I think I'll go back and fix it.  But don't quote me on that.
Here we are so far...

These are some of my funky hexies that I've been making for the Hexalong with Lily's Quilts.  I'm enjoying making these at night when the kids are asleep and the sewing machine is off.  But not sure how they'll all get along. I have a tutorial for the yellow  "Lemon Squeezie" Hexie here.
My creation

Also, my niece has been staying with us for a few days (I love summer for that!)  And we made a flower pillow.  We saw a tutorial here and gave it a try.  She did a great job. 

Taylor's flower pillow

And....for the Swoon Quilt Saga....the quilt top is complete.  Do you really want to see another picture of it? Again?  Ok....here ya go. 
The reason it's a "saga" is because my husband says it's not our "style" and that it's not for our bed.  :( So sad! I think I'll try again once it's quilted.  

So there we are!  I'm linking up with some cool ladies:

WIP Wednesday at Freshly Pieced

Esther’s Blog

How to make a Lemon Squeezy Hexie

Here's the finished product.

First you need to cut out your hexagon. This type of hexie will probably work better with a larger hexagon.

Next I marked a spot on opposite sides of the hexagon, at the same width.  So for this hexie, I counted four and a half triangles in and marked a spot for reference.  This is where you'll line up the top of your bowl or cup for the half-circles.

I used a small bowl to create the circles.  Make sure that the same (or close to) amount of triangles run along the bottom of each half circle, (ie. 9 triangles along the bottom, etc.)

To add the two other half-circles, line up the bowl so that it is touching the two half-circles that are already there, then mark.

Your hexagon should look like this.


Cut your shapes out, but be careful to make sure that they stay in the same place.  So when you're cutting, place the shapes exactly as they are in your hand.  These are not exact measurements, so if they are not in the correct place, they may not fit.
TIP: If things get mixed up, use the triangles on the paper to line things back up like a puzzle.

All cut up.

You're going to baste all paper.  It is probably better to baste using the "through the paper" method when basting curved pieces.  When you're ready to begin sewing, sew according to the picture.
In row 1 and 2, line up the straight edge on the half-circle to the straight edge of the little end piece, then sew.

When the three "rows" are sewn together, then sew row 1 to 3, then row 3 to 2.  It just makes things flow easier this way. 

I hope you're enjoying the hexalong.  I know I've never done anything like this before, but am enjoying the process of making these little things.  I don't quite have a plan as to how I'll put them together, but I like each one.

My creation