Her mother, Nicole, really like it. She's getting ready to switch everything over to her "big girl" room, since she now has another bun in the oven. So she asked if I could make a few decorative pillows. And she mentioned she would like one with the letter A on it.
Since I didn't want to use the same material that I made her name with, instead I used a lot of the materials from the circles.
But to start, I printed out a nice, big letter A using PowerPoint. I went through and chose the font I liked then chose to print the outline only, so as not to waste more ink. Don't forget to then draw a 1/4 inch seam allowance around your letter.
Next I sewed strips onto the backside of the paper using the paper piecing method. If you have questions, feel free to ask.
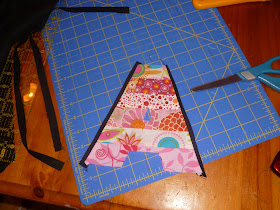
I didn't take a picture of it, but after I sewed the fabric on, I turned it over and cut out the letter A, including the 1/4 inch seam allowance. And this is what's left:
Now I wanted to outline the letter with a small black strip. And I also did not want any raw edges showing for the letter, so here's what I did.
I cut a 1 inch strip of black fabric (above), then I ironed it in half, just like you would do for binding. (Shown below.)
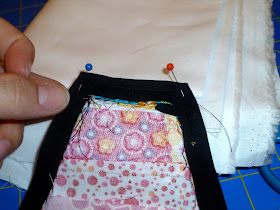
Next, pin the black to the letter, raw edges out.
After you've sewn both sides, press them, and they should fold over nicely, leaving you with no raw edges on the outside.
Sew the black onto the top of the letter. Make sure that you leave about 1/2" on either side, so that you can fold it back and create a nice finished edge on the end. (see below)
Then fold both over and pin in place. Go ahead and press it, and that will help keep them where they're supposed to go. Pins will keep them where they should be until you sew the letter down onto the other fabric.
The next part was trickier. I sewed on the small pieces of black onto the legs of the A. Then I had to fold them back, out of the way. In the picture above, you can see that when I was sewing on the center black, I folded the end, so that there would be no raw edges.
Once all three sections are sewn on, you can press them and then pin them into submission. The pressing helps out, but whatever is not in the exact place as it should be, will be taken care of when you sew it onto the other fabric. So pin away and then you'll sew it down later.
For the last pieces on the bottom, go ahead and do the same as you did on the top, making sure to leave extra black hanging off the end so that you can then fold them under and pin.
And here's the finished A. No, I did not do this for the small opening of the A. I really wanted to and tried for a while, but decided to just applique a small triangle there instead. It made life a lot easier.
I am going to sew this down onto a pillow. I will sew along in the ditch, where the pink and black meet.
I hope this helps you create a special little something for the ones you love. . . at least the ones who's name starts with an easy straight edged letter like A or T.


This should work great for the W pillow I need to make for my oldest!
ReplyDeleteGreat tutorial - thanks. Pity my Grandsons are B and D! But there's always fused applique, isn't there?
ReplyDelete