
So cut it up! But be sure to stay on the line or close to it.
Remember, you should have left over scraps from where the black line from the marker was.
Place the cut outs onto the original poster board.

Then you can begin the process of ironing on the interfacing to the material you have chosen for each specific piece. Fussy cutting can look nice, too.
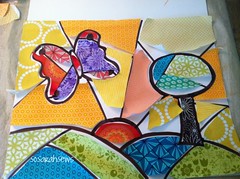
Once you have all the pieces with interfacing on the back, you are ready to begin placing them on your black background fabric.
It was easier to start from the outside and work my way in. So I started in the top left corner, then top, then left side, then filled in what was in between, and kept going.
Put a pin in your fabrics so that they will not shift and not roll up.
I suggest placing a towel under the black fabric, as it will help keep the pins in place. You do not want to go down into the fabric and then back out. It will create more holes in your interfacing. So just angle it into the fabric and into the towel.

You may have to take a few pieces out and move them over slightly as you go. Use your poster board for reference.
Once you have it where you want it, you can begin piece by piece peeling off the backing on each piece and ironing into place. You will want your iron with no steam, and on the "wool" setting.
Do not do as the directions say on the interfacing and add a damp cloth yet. Just try to iron down each piece where it goes, without allowing the iron to sit all over the other pieces. And you only need to hold it there for a few seconds to keep it in place.
This step should be done all at one time, unless you are able to leave your work on your table without little minions playing with it or spilling things on it! If you can, then I envy you!
Once everything is in place, with the paper off the back of all pieces, and they are ironed down to hold in place, you should then use the damp cloth and press the whole thing without steam and on the wool setting, as the directions for the interfacing show. (NOTE: These are the directions for the one I used, please make sure you follow your directions.)
Once that's in place, make your quilt sandwich with the backing, batting, and quilt top. You still need to place safety pins to make sure the pieces don't move while you're quilting. Then go around each piece with a tight zig zag stitch. (or blanket stitch, or whatever you'd like.)
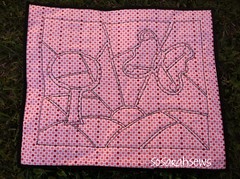
I used a lighter backing because I wanted to be able to see the stitches. But choose what you prefer.
Once you're done with that, bind it up!
Don't forget to add your pictures to the flickr group when you get them done...even if it is a year from now!

