Ya know what? I forgot a step...I wanted to have two people test my new pattern to make sure everything is right.
If you'd like to test my new Bejeweled pattern, leave me a comment. If there's only one or two of you, then you're in. If there's more than that, then we'll use Mr. Random Number Generator.
Thanks!

Friday, March 30, 2012
I finished my first pattern!

And I have it up for sale in my etsy shop. It's only $2.50.
SoSarahSewsCreations
I would love to see if you make this quilt!!!!
Linked with CrazyMomQuilts today.
And I have it up for sale in my etsy shop. It's only $2.50.
SoSarahSewsCreations
I would love to see if you make this quilt!!!!
Linked with CrazyMomQuilts today.
Thursday, March 29, 2012
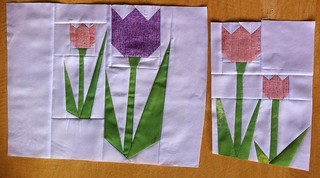
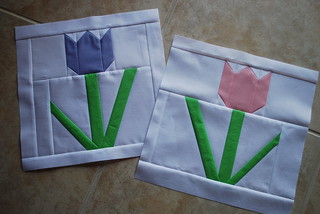
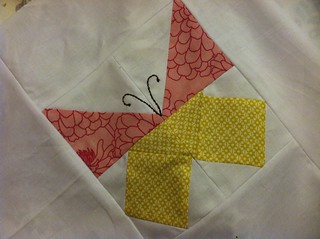
A Spring Quilt
Colleen from our Grace circle at do. Good stitches has made a great design for our next quilt.
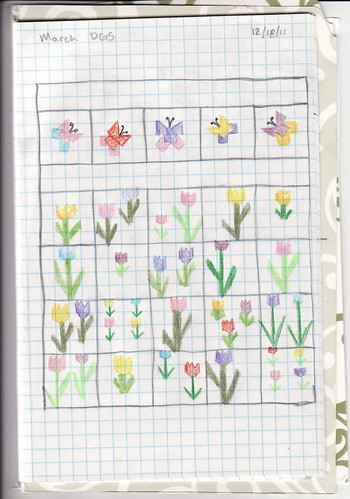
Some of the tulip blocks are being posted. Colleen made a great tulip tutorial here.
I contributed two butterfly blocks, using this tutorial here.

I love the creativity I get to be part of with this group of women! If you haven't joined in to help, there are new circles starting all the time. You should consider it.
Some of the tulip blocks are being posted. Colleen made a great tulip tutorial here.
I contributed two butterfly blocks, using this tutorial here.
I love the creativity I get to be part of with this group of women! If you haven't joined in to help, there are new circles starting all the time. You should consider it.
Wednesday, March 28, 2012
Another Cupcake Cake
This time, it was for a baby shower.

How did I ever get involved in this?! LOL

She wanted the same brown and white fabric as the wedding. Too bad I had already taken the fabric off. I had to re-glue new pieces down.

It's amazing how different the two cakes looked! (You can see the other one here!)
How did I ever get involved in this?! LOL
She wanted the same brown and white fabric as the wedding. Too bad I had already taken the fabric off. I had to re-glue new pieces down.
It's amazing how different the two cakes looked! (You can see the other one here!)
Tuesday, March 27, 2012
Finally some time to sew!
It's been a busy time around here lately. I finally had a little time to sew.
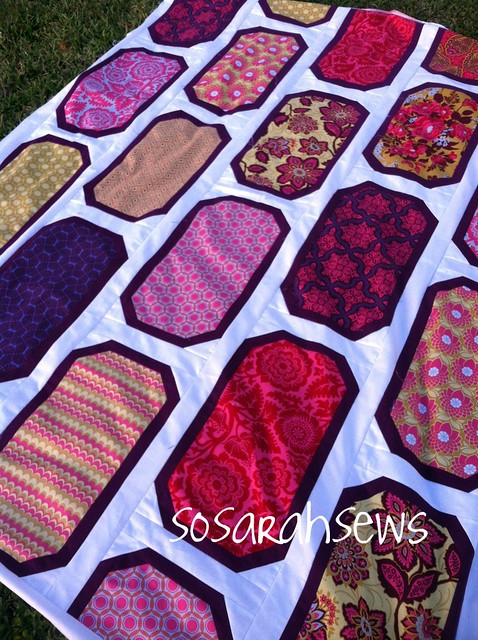
Once I bought this material (Heirloom by Joel Dewberry), I knew that I wanted to make a quilt that showed off all the beautiful large scale prints. I searched for a quilt pattern that I liked, but in the end I made my own!

It's been in my sketch book for a few months and now it's so great to see it come to life!
I'm calling it Bejeweled.

I will post more pictures as I get it quilted...and when it's not so windy!
Linking up with QuiltStory SewHappyGeek FreshlyPieced JAQSStudio
Once I bought this material (Heirloom by Joel Dewberry), I knew that I wanted to make a quilt that showed off all the beautiful large scale prints. I searched for a quilt pattern that I liked, but in the end I made my own!
It's been in my sketch book for a few months and now it's so great to see it come to life!
I'm calling it Bejeweled.
I will post more pictures as I get it quilted...and when it's not so windy!
Linking up with QuiltStory SewHappyGeek FreshlyPieced JAQSStudio
Friday, March 23, 2012
Where has the time gone?
Oh boy, it's been a while!
We had a BLAST in Disney last week for Spring Break. I had soooo much fun with the kids. And they had quite a fun time, too! We surprised them and didn't tell them until we were pulling in. Got up at 5 am to drive up to Orlando and went straight to the park. They were so excited!
As far as sewing, I haven't had much time! Which makes me sad-ish. I've been having lots of fun doing other things, though.
I finished up another circle for my circles quilt. More to come on this later.
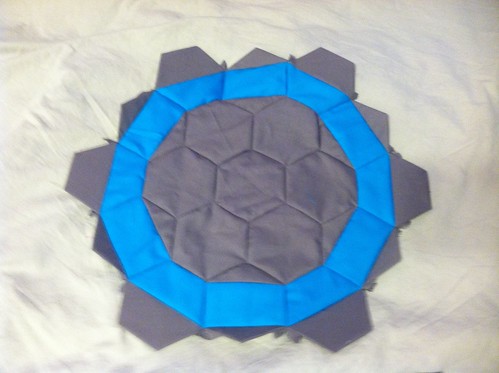
(I know...bad pic.)
And I also bought my first Perle Cotton from Yarn Bazaar. They have a great selection, great prices, and super fast shipping.
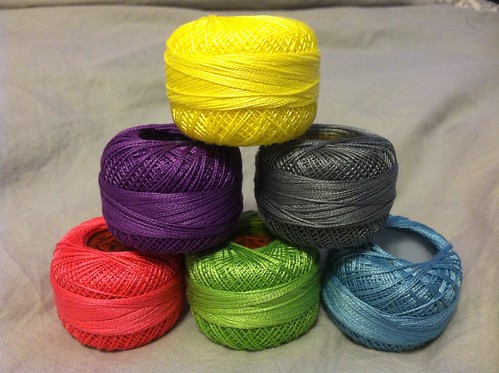
Aren't they pretty?
And here's few pics from the trip.
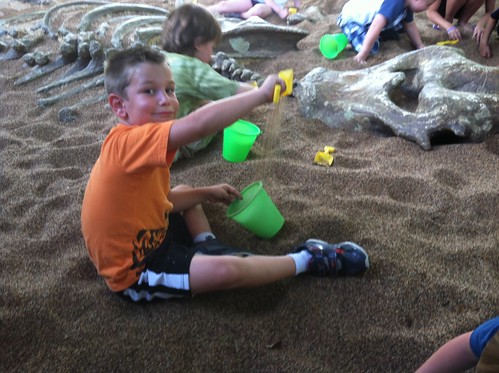
Digging up dino bones in Animal Kingdom.
Eating the obligatory Mickey Premium Bar at Hollywood Studios.
And this I found on my phone. Must have been taken in the back seat on the three hour trip.

They make me smile.
Though it was a small finish, I'm still linking up with Crazy Mom Quilts for Finish It Up Friday!
We had a BLAST in Disney last week for Spring Break. I had soooo much fun with the kids. And they had quite a fun time, too! We surprised them and didn't tell them until we were pulling in. Got up at 5 am to drive up to Orlando and went straight to the park. They were so excited!
As far as sewing, I haven't had much time! Which makes me sad-ish. I've been having lots of fun doing other things, though.
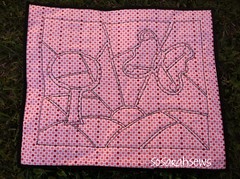
I finished up another circle for my circles quilt. More to come on this later.
(I know...bad pic.)
And I also bought my first Perle Cotton from Yarn Bazaar. They have a great selection, great prices, and super fast shipping.
Aren't they pretty?
And here's few pics from the trip.
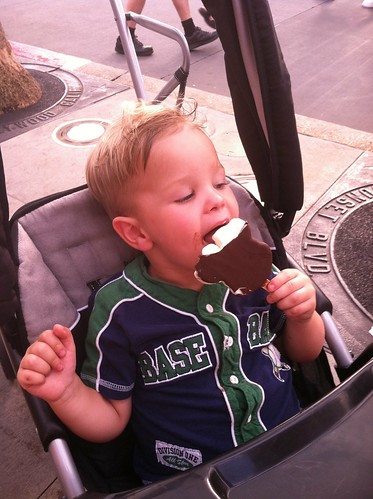
Digging up dino bones in Animal Kingdom.
Eating the obligatory Mickey Premium Bar at Hollywood Studios.
And this I found on my phone. Must have been taken in the back seat on the three hour trip.
They make me smile.
Though it was a small finish, I'm still linking up with Crazy Mom Quilts for Finish It Up Friday!
Monday, March 12, 2012
Sneaky Peaky!
Remember when I started my new hand project? Well, it's coming along!
I know this picture isn't great...but it's not meant to be.
I'll be sharing more on it soon.
But not this week, cause it's Spring Break! And we're surprising the kids with Mickey!!!!!! I CAN'T WAIT!
Have a great week!

I know this picture isn't great...but it's not meant to be.
I'll be sharing more on it soon.
But not this week, cause it's Spring Break! And we're surprising the kids with Mickey!!!!!! I CAN'T WAIT!
Have a great week!
Wednesday, March 7, 2012
South Beach QAL #3
Now you're ready to cut the interfacing.
So cut it up! But be sure to stay on the line or close to it.
Remember, you should have left over scraps from where the black line from the marker was.
Place the cut outs onto the original poster board.

Then you can begin the process of ironing on the interfacing to the material you have chosen for each specific piece. Fussy cutting can look nice, too.
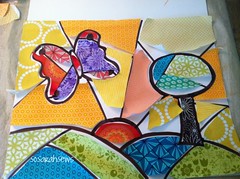
Once you have all the pieces with interfacing on the back, you are ready to begin placing them on your black background fabric.
It was easier to start from the outside and work my way in. So I started in the top left corner, then top, then left side, then filled in what was in between, and kept going.
Put a pin in your fabrics so that they will not shift and not roll up.
I suggest placing a towel under the black fabric, as it will help keep the pins in place. You do not want to go down into the fabric and then back out. It will create more holes in your interfacing. So just angle it into the fabric and into the towel.

You may have to take a few pieces out and move them over slightly as you go. Use your poster board for reference.
Once you have it where you want it, you can begin piece by piece peeling off the backing on each piece and ironing into place. You will want your iron with no steam, and on the "wool" setting.
Do not do as the directions say on the interfacing and add a damp cloth yet. Just try to iron down each piece where it goes, without allowing the iron to sit all over the other pieces. And you only need to hold it there for a few seconds to keep it in place.
This step should be done all at one time, unless you are able to leave your work on your table without little minions playing with it or spilling things on it! If you can, then I envy you!
Once everything is in place, with the paper off the back of all pieces, and they are ironed down to hold in place, you should then use the damp cloth and press the whole thing without steam and on the wool setting, as the directions for the interfacing show. (NOTE: These are the directions for the one I used, please make sure you follow your directions.)
Once that's in place, make your quilt sandwich with the backing, batting, and quilt top. You still need to place safety pins to make sure the pieces don't move while you're quilting. Then go around each piece with a tight zig zag stitch. (or blanket stitch, or whatever you'd like.)
I used a lighter backing because I wanted to be able to see the stitches. But choose what you prefer.
Once you're done with that, bind it up!
Don't forget to add your pictures to the flickr group when you get them done...even if it is a year from now!
So cut it up! But be sure to stay on the line or close to it.
Remember, you should have left over scraps from where the black line from the marker was.
Place the cut outs onto the original poster board.
Then you can begin the process of ironing on the interfacing to the material you have chosen for each specific piece. Fussy cutting can look nice, too.
Once you have all the pieces with interfacing on the back, you are ready to begin placing them on your black background fabric.
It was easier to start from the outside and work my way in. So I started in the top left corner, then top, then left side, then filled in what was in between, and kept going.
Put a pin in your fabrics so that they will not shift and not roll up.
I suggest placing a towel under the black fabric, as it will help keep the pins in place. You do not want to go down into the fabric and then back out. It will create more holes in your interfacing. So just angle it into the fabric and into the towel.
You may have to take a few pieces out and move them over slightly as you go. Use your poster board for reference.
Once you have it where you want it, you can begin piece by piece peeling off the backing on each piece and ironing into place. You will want your iron with no steam, and on the "wool" setting.
Do not do as the directions say on the interfacing and add a damp cloth yet. Just try to iron down each piece where it goes, without allowing the iron to sit all over the other pieces. And you only need to hold it there for a few seconds to keep it in place.
This step should be done all at one time, unless you are able to leave your work on your table without little minions playing with it or spilling things on it! If you can, then I envy you!
Once everything is in place, with the paper off the back of all pieces, and they are ironed down to hold in place, you should then use the damp cloth and press the whole thing without steam and on the wool setting, as the directions for the interfacing show. (NOTE: These are the directions for the one I used, please make sure you follow your directions.)
Once that's in place, make your quilt sandwich with the backing, batting, and quilt top. You still need to place safety pins to make sure the pieces don't move while you're quilting. Then go around each piece with a tight zig zag stitch. (or blanket stitch, or whatever you'd like.)
I used a lighter backing because I wanted to be able to see the stitches. But choose what you prefer.
Once you're done with that, bind it up!
Don't forget to add your pictures to the flickr group when you get them done...even if it is a year from now!
Sunday, March 4, 2012
South Beach QAL #2
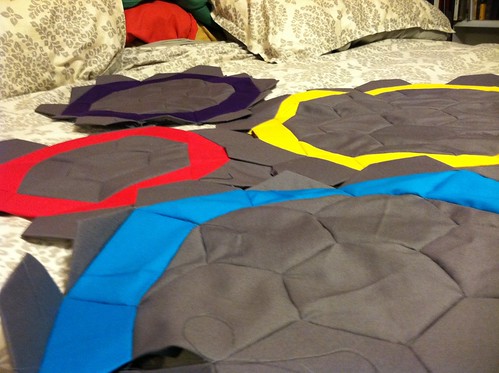
Now that you have your basic outline drawn, you'll want to add a few lines here or there within the design to break up the different elements. If you want to use smaller pieces of material, then make each section a little smaller. I left mine on the larger side.
Once you're satisfied, trace everything with the broad side of a marker. You will want the lines to be thick because you will be cutting on either side of the line, not down the middle of it. The line will represent the black fabric.
If you are going to leave circles of black, like I did in the wings of the butterfly, then make sure that you put a line on either side of the circle, so that you will be able to place the fabric and sew around it.

Next, grab your wunder under or interfacing, and place it on top of the drawing. You should use a pencil or pen for this tracing. I wouldn't recommend using a marker, because you might be able to see it through the fabric if you do not cut it perfectly.
Trace on either side of the broad black lines of the marker.
***Trace on the bumpy side of the interfacing, not the paper side. If you trace on the smooth paper side you'll end up with a mirror image of your drawing and I'm not sure what other problems you'll run in to...so don't do it! :)
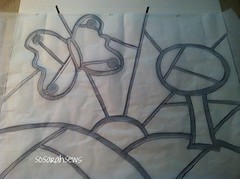
When you're done, it should look like this:

At this point, do not cut anything.
Take a look at your fabrics and your drawing on the poster board, and then try to decide where you want your fabrics to go.
You may want to color in your poster, or you can go at it and figure it out as you go.
Either way, don't cut your interfacing until you're ready to start the next process.
I'll get back to you in a few days. The next step is the longest step. You can't really pick it up and put it down, or it might get really confusing. So set aside some time for the next step. (I mean like an hour or two, not all day.)
Don't forget to add your pics to the flickr group! See ya there.
Once you're satisfied, trace everything with the broad side of a marker. You will want the lines to be thick because you will be cutting on either side of the line, not down the middle of it. The line will represent the black fabric.
If you are going to leave circles of black, like I did in the wings of the butterfly, then make sure that you put a line on either side of the circle, so that you will be able to place the fabric and sew around it.
Next, grab your wunder under or interfacing, and place it on top of the drawing. You should use a pencil or pen for this tracing. I wouldn't recommend using a marker, because you might be able to see it through the fabric if you do not cut it perfectly.
Trace on either side of the broad black lines of the marker.
***Trace on the bumpy side of the interfacing, not the paper side. If you trace on the smooth paper side you'll end up with a mirror image of your drawing and I'm not sure what other problems you'll run in to...so don't do it! :)
When you're done, it should look like this:
At this point, do not cut anything.
Take a look at your fabrics and your drawing on the poster board, and then try to decide where you want your fabrics to go.
You may want to color in your poster, or you can go at it and figure it out as you go.
Either way, don't cut your interfacing until you're ready to start the next process.
I'll get back to you in a few days. The next step is the longest step. You can't really pick it up and put it down, or it might get really confusing. So set aside some time for the next step. (I mean like an hour or two, not all day.)
Don't forget to add your pics to the flickr group! See ya there.
Friday, March 2, 2012

South Beach QAL #1
I'm so glad you're joining me on this little quilting adventure.
You will have free range to make whatever your heart desires. I think I will use my little burst of sunshine landscape in my laundry room, which has no windows. It will add a little bit of brightness to my day...since I'm in there way too much.

Anyway, the first thing you need to do is settle on your design.
Draw a few things up. You can start on a regular piece of paper, but eventually you will need to draw it on a poster board. It just makes life easier.
Poke around the internet. Google "Romero Britto" images and you'll see a ton of his designs. Do not copy his designs, but let them inspire you.
If you feel stuck on this, ask your daughter or son to help you draw something up. Or your neighbor or niece or mom. Whatever! Be free to make whatever you want!
Then you also need to gather your supplies. You will need:
-Broad tip marker or sharpie (You want it broad, so that it's easy to draw straight lines that are wide enough.)
-Poster board (Make this as big as you want. The finished size of the quilt will be the size of the poster board plus a boarder 2-4 inches, whichever you prefer.)
-Materials in various colors. Color on color prints work best. Or ones that have some graphics in black or white on them look good, too. You don't have to go out and buy a ton, just look through your scraps. But bright prints look better.
-About a yard of Fusible Interfacing. Your interfacing needs to be as large as your poster board.
-Scissors, Iron, Ironing board, pins, patience!
Ok, get your supplies ready and then start drawing up some designs and enter them into the Flickr group.
I can't wait to see what you come up with!
I'll be back in a few days with the next step.

You will have free range to make whatever your heart desires. I think I will use my little burst of sunshine landscape in my laundry room, which has no windows. It will add a little bit of brightness to my day...since I'm in there way too much.
Anyway, the first thing you need to do is settle on your design.
Draw a few things up. You can start on a regular piece of paper, but eventually you will need to draw it on a poster board. It just makes life easier.
Poke around the internet. Google "Romero Britto" images and you'll see a ton of his designs. Do not copy his designs, but let them inspire you.
If you feel stuck on this, ask your daughter or son to help you draw something up. Or your neighbor or niece or mom. Whatever! Be free to make whatever you want!
Then you also need to gather your supplies. You will need:
-Broad tip marker or sharpie (You want it broad, so that it's easy to draw straight lines that are wide enough.)
-Poster board (Make this as big as you want. The finished size of the quilt will be the size of the poster board plus a boarder 2-4 inches, whichever you prefer.)
-Materials in various colors. Color on color prints work best. Or ones that have some graphics in black or white on them look good, too. You don't have to go out and buy a ton, just look through your scraps. But bright prints look better.
-About a yard of Fusible Interfacing. Your interfacing needs to be as large as your poster board.
-Scissors, Iron, Ironing board, pins, patience!
Ok, get your supplies ready and then start drawing up some designs and enter them into the Flickr group.
I can't wait to see what you come up with!
I'll be back in a few days with the next step.
Thursday, March 1, 2012
February Sewing
It's the first of the month again...let's see what we got done last month.

First of all, I made a cupcake wedding cake for a friend's wedding.
Then I made a little pillow for them out of the same fabric I covered the fake cakes with. You can read why I embroidered "Yes I do I promise" on it here.
Then of course it was Valentine's Day and the kids helped me make these lip and moustache lolipops. You can find the printouts here.

Last but not least I made this mini quilt for the Mini Quilt Challenge. Please read about the inspiration for it here.
Then, join the Quilt Along! I'll be starting the posts on Friday. It won't take too long, and it's a great project for you to do with a friend. Let your imagination run wild!
![]()


First of all, I made a cupcake wedding cake for a friend's wedding.
Then I made a little pillow for them out of the same fabric I covered the fake cakes with. You can read why I embroidered "Yes I do I promise" on it here.
Then of course it was Valentine's Day and the kids helped me make these lip and moustache lolipops. You can find the printouts here.
Last but not least I made this mini quilt for the Mini Quilt Challenge. Please read about the inspiration for it here.
Then, join the Quilt Along! I'll be starting the posts on Friday. It won't take too long, and it's a great project for you to do with a friend. Let your imagination run wild!
Subscribe to:
Posts (Atom)